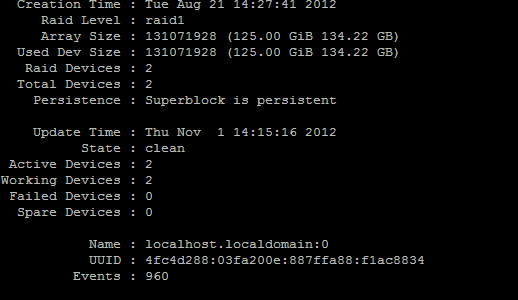
I decided to rearrange space a bit on the new CentOS server I am setting up to replace the ageing Fedora 8 setup currently in use…
When I installed it (three weeks ago), I split the two 500GB hard drives into 3 partitions and 2 raid levels to suit my needs:
- 100GB RAID1 /md0 made up of /dev/sda1 and /dev/sdb1 (100GB on each disk) – mounted as / – this will store the OS and all important files so redundancy is a must
- 150GB RAID0 /md1 made up of /dev/sda2 and /dev/sdb2 (75GB on each disk) – mounted as /vz – (testing) virtual machines dedicated space, speed is a must, redundancy is not needed
- 574GB (remaining space) RAID0 /md2 made up of /dev/sda3 and /dev/sdb3 (287GB on each disk) – mounted as /down for file storage – non-important big files, speed and space needed, redundancy not a requirement
In the meantime I realized I reserved too much space for the virtual machines, so I decided to reduce it with 50GB (25GB on each drive) and transfer that space to the md0 device (RAID1).
Since both md1 and md2 are currently empty, and the difficulties of finding information about resizing RAID0 devices (might not even be possible), the first step for me was to delete the md1 device and its partitions (to make room where md0 would grow).
I initially tried to follow a tutorial which suggested I use
mdadm --grow /dev/md0 --size=XXXXX
to directly resize the RAID device using mdadm, but this failed for me with the “Not enough space on the device” error. This is easily confirmed using mdadm –examine /dev/sda1 (and sda2)
/dev/sda1:

...

Raid Level : raid1

Raid Devices : 2

Avail Dev Size : 209715056 (100.00 GiB 107.37 GB) <-- maximum size is

Array Size : 209715056 (100.00 GiB 107.37 GB) <-- equal to current size

Super Offset : 209715184 sectors

State : clean

...
So I decided to do things my own way…
1. Prerequisites
Use a linux rescue system – SystemRescueCD is my favorite, but this time I used the PartedMagic live image (network booted) for its loading speed.
Backups are a must! Always back up when performing filesystem operations.
We will be using both the GUI GParted and the console mdadm tool.
We will be working on /dev/md0.
2. The steps
Boot into the rescue system. Make sure the raid device is not assembled (PartedMagic does not assemble RAID devices automatically, while SystemRescueCD does, as md12x)
Assemble the raid device:
mdadm --examine --scan

mdadm --assemble /dev/md0 /dev/sda1 /dev/sdb1
We will be resizing sda1 first, so we need to fail it and remove it from the raid:
mdadm --fail /dev/md0 /dev/sda1

mdadm --remove /dev/md0 /dev/sda1
Now stop the raid device:
mdadm -S /dev/md0
Open GParted and resize the sda1 partition to its new size. After the resize the partition showed wrong used/free space values. We can ignore that for now.
Re-add sda1 to the raid:
mdadm --add /dev/md0 /dev/sda1
Now wait for it to sync. You can monitor the progress with:
cat /proc/mdstat

md0 : active raid1 sda1[2] sdb1[1]

104857528 blocks super 1.0 [2/1] [_U]

[===============>.....]  recovery = 79.9% (83821376/104857528) finish=4.1min speed=83548K/sec

bitmap: 0/1 pages [0KB], 65536KB chunk
Now that we have sda1 as the good resized drive we fail sdb1 (to be able to resize it in GParted):
mdadm --fail /dev/md0 /dev/sdb1

mdadm --remove /dev/md0 /dev/sdb1
Resize the sdb1 partition in GParted. Then re-add it to md0 (data will sync once again to make the RAID1 device consistent). Once the sync is done, we can finally grow the md0 volume to its new size.
Checking mdadm –examine /dev/sda1 (and sdb1) shows the raid device has room to grow in:
/dev/sda1:

...

Raid Level : raid1

Raid Devices : 2

Avail Dev Size : 262143856 (125.00 GiB 134.22 GB) <-- available size is

Array Size : 209715056 (100.00 GiB 107.37 GB) <-- bigger than array size

Used Dev Size : 209715056 (100.00 GiB 107.37 GB)

Super Offset : 262143984 sectors

State : clean

...
Disable write-intent bitmap on the raid device (otherwise resize is not allowed):
mdadm --grow /dev/md0 --bitmap=none
We can finally grow the md0 device using:
mdadm --grow /dev/md0 --size=max <-- max=maximum allowed, in my case the desired 125GB
The device resyncs one more time.
Re-enable write-intent bitmap:
mdadm --grow /dev/md0 --bitmap=internal
Then perform a filesystem scan:
e2fsck -f /dev/md0
And the final step is to grow the filesystem as well (so we can actually use the new size):
resize2fs /dev/md0
For xfs filesystems use:
xfs_growfs /dev/md0
Done. Reboot into the normal system.
All that’s left now for me is to recreate the deleted md1 RAID0.


Pingback: Resize openSUSE 12.3 GPT ext4 partitions in a RAID1 disk array – Internet and Tecnnology Answers for Geeks
Pingback: Error with trying to resize software raid device